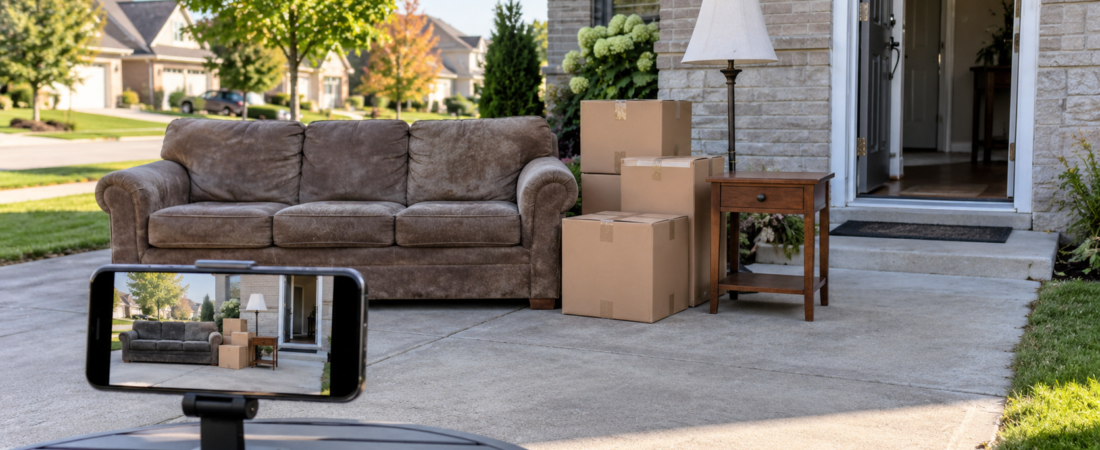
Clear photos for a junk removal quote can help a responding provider understand the type and approximate volume of material, identify bulky items, see stairs or other access conditions, and decide what follow-up questions to ask. The most useful photo set normally includes an overview of the entire project, a second angle showing depth, close-ups of large or unusual items, and photographs of the route between the items and the likely vehicle-access point.
Photographs are only part of the request. They cannot reliably show exact weight, everything inside closed boxes, hidden material, appliance connections, building rules, or whether a provider accepts a particular item. Add a written item list, location details, access information, and preferred timing. A photo-based estimate may still need to be confirmed after the provider reviews the complete scope or sees the project in person.
You can submit a free, no-obligation junk-removal request with your written project details. The current public form does not display a photo-upload field, so keep your images ready to share through an appropriate method if a responding provider requests them.
London Junk Removal Quotes is an independent quote-request website. We do not directly perform removal, review photographs as the service provider, or set the final price. Availability, estimates, accepted items, qualifications, and service terms are determined by the responding provider.
Quick photo checklist for a junk-removal estimate
Before sending anything, check whether your photo set includes these views:
| Photograph | What it should show | Why it helps |
|---|---|---|
| Full overview | The entire pile, room, or group of items in one frame | Establishes the general scope and surrounding space |
| Second angle | The same area from another side | Reveals depth, overlaps, and items hidden in the first view |
| Large-item views | Each couch, mattress, appliance, cabinet, or other bulky object | Helps identify size, type, condition, and possible handling needs |
| Quantity view | Rows of bags, stacks of boxes, shelving, or repeated items | Makes counts and approximate volume easier to understand |
| Access route | Stairs, hallways, doors, elevators, gates, corners, or slopes | Shows carrying conditions that may affect labour and equipment |
| Exterior access | Driveway, legal parking area, loading zone, or distance to the building | Helps explain the likely carry to the removal vehicle |
| Special-condition view | Damaged, wet, sharp, dense, unusually heavy, or uncertain material | Prompts the right acceptance and handling questions |
Do not risk an injury to obtain a photograph. Never climb onto an unstable pile, pull heavy furniture forward by yourself, open damaged containers, or handle a substance you cannot identify safely.
Before taking pictures, define what is actually being removed
The camera cannot tell a provider which belongings should stay. Complete a first sorting pass before photographing the project whenever possible.
Create separate groups for:
- Remove: items definitely included in the request
- Keep: belongings that must remain
- Donate or sell: usable items you plan to handle separately
- Ask about: materials whose acceptance or preparation requirements are uncertain
Move small wanted belongings out of the removal group or label them clearly for your own reference. Do not place a “keep” box in the middle of a photographed junk pile and assume its purpose will be obvious later.
For a rental, estate, or shared property, the person authorizing removal should verify what may legally and practically be removed before the photographs are sent. A service provider cannot decide ownership from an image.
Step 1: Take one wide overview of the whole project
Begin far enough back to fit the entire pile, room, garage section, storage area, or curbside group in the frame. An overview establishes context before the provider looks at individual items.
For a better wide shot:
- Clean the phone’s camera lens
- Turn on room lights and open curtains when practical
- Stand in a stable location rather than leaning over the pile
- Use the normal camera view when possible; extreme wide-angle settings can distort proportions
- Hold the phone level and keep the image sharp
- Include the floor and surrounding walls or doorway when they help show scale
- Avoid cutting off the outer edges of furniture or the back of the pile
A close-up of one chair does not show that the chair is surrounded by twelve boxes and two cabinets. Lead with the whole scene.
Step 2: Photograph the same area from a second angle
One photograph can flatten depth. A pile that looks one row deep may contain several layers, and the front of a garage may conceal shelves or bags behind it.
Move to a safe second position and photograph across the area from another side. The second angle should answer questions such as:
- How deep is the pile?
- Are items stacked behind one another?
- Is furniture covering boxes or loose material?
- Does the pile continue around a corner?
- Is there enough room to reach the items safely?
For a filled room, use opposite corners when accessible. For a driveway pile, take one view from the front and another from the side. For shelving, include a straight-on image and an angled view showing shelf depth.
Step 3: Give large or awkward items their own photographs
Bulky objects can affect carrying, disassembly, vehicle space, and equipment needs. Photograph each important item separately when it is not clearly visible in the overview.
Examples include:
- Couches, sectionals, sofa beds, and recliners
- Mattresses, box springs, and bed frames
- Dressers, wardrobes, cabinets, desks, and large tables
- Refrigerators, freezers, washers, dryers, stoves, and dishwashers
- Exercise equipment
- Safes, pianos, stone pieces, or other unusually heavy objects
- Long shelving, oversized outdoor items, or dismantled structures
Try to fit the entire item in the frame. Add a side angle when depth matters. If a sectional separates into pieces, state that in writing rather than assuming it is visible. If a sofa contains a bed mechanism, identify it because its weight and handling can differ from a standard couch.
For a dedicated furniture request, review the furniture removal quote information. For refrigerators, laundry machines, stoves, and similar items, use the appliance removal quote page.
Step 4: Show scale without creating a misleading picture
Photographs can make items look larger or smaller depending on lens choice and distance. Provide a practical reference when scale is unclear.
Useful options include:
- A doorway, standard stair tread, or visible room feature
- A tape measure placed safely along one side of a large item
- Written dimensions for a couch, cabinet, table, or appliance
- A count of identical bags, boxes, chairs, or panels
Do not use a person as the only scale reference. Do not place a child, pet, private document, or vehicle licence plate in the frame. When measurements are important, write them in the accompanying description because a perspective photograph is not a precise measuring tool.
Show the height and depth of stacked material
For stacked boxes, bags, wood, or renovation debris, take:
- A straight-on view showing width and height
- A side view showing depth
- A written count or approximate dimensions
If the pile is irregular, describe which parts are dense and which are light. A large volume of empty cardboard is not the same as an equally large-looking pile of tile, soil, or concrete.
Step 5: Photograph stairs, doors, hallways, and elevators
Access photographs are often as important as item photographs. The provider may need to understand how far and through what route the material must be carried.
Show:
- The staircase from top and bottom when safe
- Stair width, landings, turns, railings, and low ceilings
- Narrow doorways and tight hallway corners
- Basement exits or exterior steps
- Elevator doors and the route to the loading area
- Gates, fences, slopes, or uneven outdoor surfaces
- The distance from a backyard, storage room, or unit to the likely parking point
Do not stand backward on stairs while taking a picture. Stop in a stable location, hold the phone securely, and avoid blocking an active walkway.
If a building requires an elevator reservation, loading-zone booking, concierge access, restricted service hours, or proof of insurance, write that separately. A photo cannot communicate the rule.
Step 6: Show the likely vehicle and parking access
The provider needs location and access information, but it does not need unnecessary private details in the image.
Photograph the general route or parking situation when:
- The driveway is narrow, steep, shared, or obstructed
- Street parking is limited or regulated
- The building has a loading dock or designated service entrance
- The items are a long distance from the nearest legal stopping point
- A gate, alley, courtyard, or underground garage affects access
- Construction, snow, landscaping, or another temporary condition changes the route
Frame the photo to avoid readable licence plates, house numbers, entry codes, faces, and neighbouring private areas whenever those details are not needed. Provide the pickup address and instructions in the secure written request rather than relying on an image of the property number.
Step 7: Document boxes, bags, cabinets, and hidden contents honestly
Closed containers create uncertainty. A photograph of twelve identical boxes does not reveal whether they hold clothing, books, dishes, tools, tiles, or mixed waste.
Add written details such as:
- Approximate number of boxes or bags
- Whether they are full, partly full, or empty
- General contents
- Whether any are unusually heavy
- Whether boxes are sealed and safe to lift
- Whether cabinets, drawers, and shelves will be emptied before pickup
If it is safe and does not expose private belongings, one representative open-box photograph may help show the material type. Do not open unknown, leaking, damaged, or unstable containers for the sake of a quote.
For a garage, take wide photographs before close-ups so the provider can see how shelves, floor piles, tools, and large items relate to one another. The garage cleanout quote page explains other information that can affect the request.
Step 8: Identify heavy, damaged, or potentially restricted material
Photographs can alert a provider to special conditions, but they do not confirm acceptance. Mention these materials explicitly:
- Concrete, brick, soil, stone, roofing, tile, or other dense debris
- Sharp metal, glass, nails, or broken fixtures
- Wet, mouldy, pest-affected, or contaminated belongings
- Refrigerators, freezers, air conditioners, or other refrigerant-containing equipment
- Electronics, batteries, tires, and propane cylinders
- Paint, solvents, fuel, automotive fluids, pesticides, pool chemicals, and other hazardous or reactive products
- Medical waste, needles, asbestos or suspected asbestos-containing material
Do not rearrange, open, smell, combine, drain, or closely handle an unknown product to photograph it. If it is safe to do so from a stable distance, a clear image of the container can support a conversation, but the written description and provider confirmation remain essential.
The City of London provides separate Household Hazardous and Special Products guidance for many corrosive, flammable, poisonous, or reactive products. Acceptance by a private provider varies and must be confirmed directly.
How many junk-removal photos should you take?
There is no universal number. Use enough photographs to show the full scope without sending many blurry or repeated images.
| Project | Practical starting point | Important views |
|---|---|---|
| One couch, mattress, appliance, or other single item | 3–5 photos | Full item, side angle, access route, stairs if present |
| Small outdoor or curbside group | 3–6 photos | Whole group, side view, individual bulky items, parking access |
| One room, basement area, garage section, or storage locker | 6–12 photos | Opposite-corner views, hidden depth, large items, exits, carrying route |
| Several rooms or a whole property | Organize a short series for each area | One overview plus necessary detail and access photos for every room |
| Commercial or managed building | Scope-based series | Work areas, repeated items, elevator/loading route, dock, parking and restrictions |
These numbers are an editorial starting point, not a provider requirement. A simple job may need fewer photographs; a complex cleanout may need more. If a provider specifies a file limit or asks for particular angles, follow that instruction.
Photo checklist by project type
Couch, mattress, or furniture removal
Photograph the entire item, a side view, any detachable sections, the nearest doorway, stairs, tight turns, and the path to the exit. Add approximate dimensions when the item is oversized. Identify sofa beds, glass sections, damaged frames, and unusually heavy construction.
Appliance removal
Show the full appliance, its current location, surrounding clearance, doorways, stairs, and any visible connection area that can be photographed safely. State whether water, electrical, or gas connections are present and whether qualified disconnection has been completed. Do not move or disconnect an appliance merely to create a better picture.
Basement cleanout
Begin with views from two corners, then photograph large items, stacked storage, the staircase from stable positions, landings, low ceilings, and the exterior exit. State whether the basement is dry and safely accessible. Visit the basement cleanout quote page for the project-specific request form.
Garage or shed cleanout
Show the floor area, shelving, both sides of deep piles, large equipment, dense materials, garage-door access, and the driveway. Identify paint, automotive fluids, fuel, batteries, propane, tires, or other products separately rather than hiding them among ordinary clutter.
Rental-property or estate cleanout
Create a room-by-room sequence. Start each area with an overview, then photograph bulky or uncertain items and the carrying route. Remove private papers, medication, photographs, financial records, keys, and valuables from view. The authorized person should confirm what may be removed. Larger turnover projects can use the landlord and rental-property cleanout page.
Yard waste and outdoor material
Photograph the pile from the front and side, then show branch thickness, bags, soil or sod, fencing, gate width, and the distance to legal vehicle access. State whether the material is loose, tied, bagged, wet, mixed with household junk, or contains dense soil or stone. See the yard-waste removal quote page for related project details.
Renovation debris
Show width, height, depth, and material type. Photograph separate groups of drywall, lumber, flooring, cabinets, metal, tile, concrete, soil, or fixtures rather than treating all debris as identical. State whether nails, sharp edges, dust, liquids, or suspected hazardous material are present. Do not enter an unsafe work zone or disturb suspected asbestos-containing material.
Office, retail, or commercial cleanout
Show each work area, quantities of repeated furniture or shelving, large equipment, stairs or service elevators, loading docks, and the route to legal parking. Do not expose customer records, employee information, computer screens, access badges, alarm panels, keys, or confidential documents. Use the commercial junk-removal quote page for business-project information.
Details that photographs cannot show reliably
Even a strong photo set needs a written explanation. Images may not reveal:
- Exact weight or material density
- Contents of sealed boxes, bags, drawers, or cabinets
- Items behind a wall of furniture or under a tarp
- Moisture, odour, pests, contamination, or structural instability
- Whether an appliance is connected or contains refrigerant
- Whether an item contains a bed mechanism, stone top, motor, or hidden weight
- The total carrying distance when the route is not captured continuously
- Elevator bookings, parking rules, restricted hours, or property permissions
- Ownership or authorization to remove belongings
- A move-out, closing, renovation, or tenant-turnover deadline
- Whether the provider accepts the material
- Whether disassembly, sweeping, donation, recycling, or special handling is included
Write these facts alongside the images. A provider can only assess information it receives.
Use this written description with your photo set
Copy and complete this template:
Pickup area: London neighbourhood or postal code
Property type: House, apartment, condominium, rental property, office, shop, or other
Items: List the main furniture, appliances, boxes, bags, debris, or outdoor material
Quantities: Approximate count of each major item or container
Current location: Outside, garage, main floor, upstairs, basement, storage area, or several rooms
Access: Number of stairs, elevator, narrow doors, gate, loading area, parking, and approximate carrying distance
Heavy or special items: Identify dense, connected, damaged, wet, sharp, contaminated, or potentially restricted material
Preferred timing: State the requested date and any genuine deadline
Photo order: Briefly identify what each group of images shows
Questions: Ask whether the items are accepted and whether the estimate needs an on-site confirmation
Use the quote form for the written project details, then keep the photographs available for the responding provider.
Protect privacy before sharing removal photos
Photographs taken inside a home or business can reveal more than the intended junk. Review every image before sending it.
Remove, cover, crop out, or retake images that expose:
- Mail, invoices, identification, account numbers, or financial records
- Medication labels or private health information
- Family photographs or faces
- Children, residents, customers, or employees
- Computer screens, whiteboards, calendars, and confidential business records
- Keys, access cards, alarm panels, entry codes, or security-camera locations
- Licence plates and unnecessary house-number details
- Valuable items that are not part of the removal request
Share the photographs only through the communication method you expect from the site or responding provider. If an unexpected person requests sensitive property images, verify who is contacting you before sending them.
Common photo mistakes that create more questions
Sending only close-ups
A close-up may identify an object but hide the total volume. Always include an overview first.
Taking one picture of a deep pile
Add a side or reverse angle so the depth is visible.
Using a dark or blurry image
Turn on available lights, steady the phone, and retake the photograph. A clear ordinary image is more useful than a heavily edited one.
Cropping off parts of large furniture
Step back safely so the entire item appears in the frame. Add dimensions if it still looks unclear.
Hiding the stairs or carrying route
The route can affect the work as much as the item. Photograph the safe access path and describe anything the image misses.
Showing boxes without describing their contents
State whether boxes hold light household goods, books, tools, dishes, tile, mixed waste, or unknown material.
Sending dozens of duplicates
Select the clearest views, place them in a logical order, and remove accidental or repeated images.
Applying filters or creating a collage
Filters can alter colour and visibility. Collages can reduce detail. Send clear original-style images whenever possible.
Forgetting privacy
Inspect the background for personal documents, faces, screens, licence plates, and valuables before sharing.
Photo estimate versus final confirmed scope
Clear photographs can reduce uncertainty, but they cannot guarantee a final price. A provider may treat the initial amount as an estimate until it confirms the actual items, access, labour, vehicle capacity, disposal requirements, and any special conditions.
Before approving work, ask:
- Is the amount based only on the photographs or on a complete written item list as well?
- Is it an estimate or a firm quote?
- What assumptions were made about volume, weight, stairs, carrying distance, disassembly, and disposal?
- Will the scope and price be confirmed before loading begins?
- What happens if there are hidden items or the actual quantity is different?
- How are additions handled if you decide to include more items?
The complete guide to how junk removal works from request to pickup explains the rest of the process. Update that linked article first so its new title and content match this anchor.
Frequently asked questions
What photos should I take for a junk-removal quote?
Take one wide overview, a second angle showing depth, separate images of large or unusual items, and photographs of stairs, doors, hallways, elevators, gates, carrying distance, and parking when relevant. Add a written item list and access details.
How many junk-removal pictures should I send?
There is no universal number. A single item may need only a few clear views, while a room or whole-property cleanout needs an organized series. Include enough images to show the complete scope, then remove blurry and duplicate photographs. Follow any limit provided by the responding provider.
Should I photograph every item separately?
Not always. Use wide shots for groups of boxes, bags, small items, or room contents. Give bulky, heavy, damaged, unusual, or partly hidden items their own photographs when the overview does not show them clearly.
Should I measure furniture or appliances?
Approximate width, height, and depth can help when an item is oversized or must pass through a tight opening. Measurements do not replace photographs of the item and access route. Do not move heavy objects merely to measure them.
Do I need to photograph stairs and hallways?
Yes, when the items must travel through them. Show stair turns, landings, low ceilings, narrow doors, tight corners, elevators, gates, and the distance to likely vehicle access. Take every photo from a stable position.
Can clear photographs guarantee the final junk-removal price?
No. They can help a provider understand the project, but photographs may not reveal exact weight, hidden contents, contamination, access rules, or all required labour. Ask whether the amount is an estimate and when the final scope will be confirmed.
What should I say about closed boxes and bags?
Provide the approximate count, general contents, whether they are full, and whether any are unusually heavy. Do not open leaking, damaged, unstable, or unknown containers for a photograph.
Should I photograph paint, fuel, chemicals, or propane cylinders?
First, do not move, open, mix, smell, or handle uncertain products. If a photograph can be taken safely from a stable distance, it may help identify the container, but you must also name the material and confirm the appropriate disposal route. Standard providers may not accept it.
How do I protect privacy in my photos?
Remove or crop out mail, identification, medication labels, family photographs, faces, computer screens, access codes, keys, licence plates, confidential records, and valuables. Review every image before sending it.
Can I upload photos through the London Junk Removal Quotes form?
The current public form asks for written project and access details but does not display a photo-upload field. Submit the form accurately and keep your images ready. An available provider may request them through an appropriate follow-up method.
Does London Junk Removal Quotes create the estimate from my pictures?
No. London Junk Removal Quotes is an independent quote-request and lead-generation website. A responding independent provider decides whether to request photographs and is responsible for its own estimate, accepted items, pricing, availability, qualifications, disposal practices, and service terms.
Prepare your photos, then request a quote
Take an overview, show the depth of the project, photograph large items and the access route, and add the facts that images cannot communicate. Clear information gives the responding provider a better basis for asking questions and discussing the project.
Request My Free Junk-Removal Quote
The current form collects written project details. Keep your photographs ready to share if an available provider requests them. London Junk Removal Quotes does not directly perform junk removal or guarantee that photographs will produce a final price. Provider availability, estimates, accepted materials, qualifications, disposal practices, and service terms must be confirmed directly with the responding provider.